About

Wednesday, May 30, 2012

Tasty Tuesday......A Day Late.


 Better late then never right.....Yesterday was just an all around 'MEH' day. Beryl was taking his sweet time arriving with our predicted rain/wind, it was overcast outside and the toddler was in 'a mood'. So yeah I'm sure you can imagine that not much got done around here yesterday. Thankfully today is better, the sun is out, the toddler had a friend over this morning and is now napping away! Which gives me time to share this yummy recipe that includes two of my favorite foods. {Bananas and Peanut Butter} I will eat them anyway I can get them. I prefer them in a sandwich...together. With super fresh white bread....You know so when you take a bite it sticks to the roof of your mouth?! Mmmmmm...The Best!
On another note we are trying to eat 'cleaner' as well. Less processed sugars and foods. Much easier said then done but we're trying. Honestly Hunter is doing MUCH better with it then I am :o/ I modified the recipe to follow more of a paleo style of recipe. And please note that use the term 'paleo' very loosely! I have flat refused to give up my bread and cheese. I enjoy food to much and if it means a extra inch on my waste so be it! I'll just work out a little more! 
I found the recipe here on allrecipes.com.

Peanut Butter Banana Bread

Ingredients

  • 1/2 cup butter, softened
  • 1 cup sugar
  • 2 eggs
  • 1 cup mashed ripe banana
  • 3/4 cup chunky peanut butter
  • 2 cups all-purpose flour
  • 1 teaspoon salt
  • 1 teaspoon baking soda

Directions

  1. In a mixing bowl, cream butter and sugar. Add eggs, one at a time, beating well after each addition. Add bananas and peanut butter; mix well. Combine the flour, salt and baking soda; add to creamed mixture. 
  2. Transfer to a greased 9-in. x 5-in. x 3-in. loaf ban. Bake at 350 degrees F for 70-75 minutes or until toothpick inserted near the center comes out clean. Cool for 10 minutes before removing from pan to a wire rack to cool completely. 

 To make it more of a paleo recipe we used organic peanut butter and  local raw honey instead of the 1cup of sugar. When substituting honey for sugar use equal parts replacement up to 1 cup. If the recipe calls for more then 1 cup of sugar you substitute 3/4 of the amount called for for anything over a cup. Does that make since? If I totally confused you you can use the google and find the information as well. If your local we get our honey from the Summerville Farmers Market. It's so tasty, cheaper then at a grocery store and eating local honey is proven to be good for your health. Also when baking with honey you have to watch your oven temp and cook time more closely. It is suggested that you reduce the cooking temp by 5 degrees since honey browns/burns faster then regular sugar.

 I decided on muffins instead of a loaf and was able to get a dozen large muffins and a dozen mini muffins out of this recipe. 

 They are delicious! The kids loved um and I have already eaten two. :oP They are not as sweet as a 'normal' muffin but still hold alot of flavor and quite a bit of sweetness. Enjoy!!!


Do you have any cooking tips for using healthier substitutes? 

 Thanks for stopping by!
~Alison  

Wednesday, May 23, 2012

I made a shirt!


Seriously! In all the sewing that I do I rarely make things for myself. But I ordered this fabric MONTHS ago and wasn't sure what to do with it. It was one of those pieces I loved so much I was afraid to cut it. Fellow sewing friends and fabric-a-holics know exactly what I'm talking about! So last week I picked up a new pattern, got to cutting and this is what I got.......


I have to say that I'm pretty darn proud!  A homemade, hand sewn shirt that I'm not embarrassed to wear in public! I even got *gasp* compliments on it! Made my day! 

Anywho, just wanted to share and please feel free to laugh at my modeling attempts :oP. I have no shame! 


Tuesday, May 22, 2012

Tasty Tuesday - Jamaican Pig on a Stick

I've decided I'm going to make Tuesdays.....Tasty Tuesdays.....here at Sugared Magnolias. Food has to be one of my favorite past times. Be it cooking or eating ; I'm always in a happy place if there is food involved.
The recipe I'm sharing today is one I've had for about 5 years now. At first it seemed very daunting because of all of the ingredients put into it. I was afraid it would be extremely over powering. Not in the least is it overpowering.....It's mouthwatering! It comes from one of my favorite cooks.....Mrs. Paula Deen herself :o)I love that woman! I mean any person who can come up with something called 'Ooey Gooey Butter Cake' is all right by me.

Jamaican Pig on a Stick (source)

Ingredients

  • 2 pounds pork tenderloin
  • 1/2 cup light soy sauce
  • 1/4 cup olive oil
  • 2 cloves garlic, minced
  • 1 tablespoon Dora's Jerk Seasoning, recipe follows
  • Caribbean Dipping Sauce, recipe follows
  • Special equipment: 2 dozen (10-inch) wooden skewers soaked in water for 20 minutes, then drained well.

Directions

Cut tenderloin in half crosswise. Cut each half lengthwise into 4-inch thin strips. Place pork in a heavy duty re-sealable plastic bag.
In a small bowl, combine soy sauce, olive oil, garlic, and jerk seasoning. Pour over pork. Seal bag, and marinate pork in refrigerator, 1 hour.
Turn on broiler.
When ready to cook the pork, line a broiler pan with aluminum foil. Lightly grease rack and place on pan. Remove pork from bag; discard marinade.
Thread pork onto skewers in an "s" shape. Place skewers in a single layer on a prepared pan. Broil 5 inches from heat for 8 minutes, turning once. Serve warm with Caribbean Dipping Sauce.

1 tablespoon kosher salt
1 teaspoon ground allspice
1 teaspoon brown sugar
1 teaspoon garlic powder
1 teaspoon onion powder
1/2 teaspoon dried, crushed Scotch bonnet pepper
1/2 teaspoon paprika
1/2 teaspoon dried chives
1/2 teaspoon ground nutmeg
1/2 teaspoon freshly ground black pepper
1/2 teaspoon ground ginger
1/4 teaspoon ground cinnamon
1/4 teaspoon ground cloves
1/4 teaspoon dried thyme
Combine all ingredients in a bowl until well mixed. Store in an airtight container.
Yield: 1/2 cup (You will not use all of this seasoning. I keep my extra in a small glass mason jar to be used next time. Spices don't 'good bad' and there's no use in wasting.)

Caribbean Dipping Sauce:
1 tablespoon butter
1/2 to 1 jalapeno pepper, seeded and minced
1 teaspoon grated fresh ginger
1 (18-ounce) jar orange marmalade
2 tablespoons fresh lime juice
1/4 teaspoon salt
In a medium saucepan, melt butter over medium-high heat. Add pepper and ginger, and cook 2 minutes, stirring frequently. Reduce heat to medium-low, and stir in marmalade, lime juice, and salt. Simmer 5 minutes, stirring frequently.
*Cook's Note: Jalapeno peppers are extremely hot. We recommend wearing disposable gloves when handling them.
Yield: 2 cups


I personally have never made the dipping sauce. I'm not much of a sauce person because I feel it masks other flavors in the meat or from the cooking process. If anyone does try please let me know what you think. I have also tried this marinade on whole pork tenderloins. Marinating them for 4 hours before grilling....There are no words for the juicy pieces of pork heaven that come off the grill. 

If you give this a try please come back and let me know what you thought!!!


Wednesday, May 2, 2012

Soft Pieces of Buttered Heaven


 I LOVE biscuits...any kind of biscuit....Especially a good homemade biscuit! However making the perfect homemade biscuit is usually a challenge. They have a tendency to end up hard and more suited for use as weapon then eating. A few months ago I found a recipe on Pinterest ( Hello, My name is Alison and I have a pinterest addiction ) and I kept forgetting about it. And honestly biscuits are time consuming and time isn't something I usually have extra of when it comes to making dinner and wrangling a toddler. So today I decided to give it a go. THEY WERE SO EASY! Messy...very messy but easy to make.  I found the recipe here Blue Chateau Interiors and the recipe for a strawberry jam (similar to mine ) can be found here. (Canning and preserving is super easy people....seriously give it a try!)
And the great part is even though we each ate 2 or 3 each the recipe makes much more. So we have yummy, buttery pieces of heaven for breakfast too!

Give um a try!! I'd be happy to come over and be your taste tester. Oh, and for the record I prefer the middle biscuit from the pan. :o)


Wednesday, February 22, 2012

Thrifty Finds

Hi! Sorry things have been kinda silent around here lately but we are back!!!


If you know me personally you know that I am a thrift store loving gal!! No lie I'm usually in one at least 3 times a week. I don't always find anything super awesome but lately I've hit the jackpot!

I found these vintage aluminum cookie cutters at Goodwill last week for $3.
They were in a GIANT bag of plastic cookie stamps and I just couldn't pass them up. Plus I spotted these 2 guys in there as well. To cool! 
Now to share the find that I am most excited about! When we moved back to Charleston I promised myself that I would save my pennies and purchase some beautiful art pieces by local artist. If you live here you know the options are endless!! Charleston is full of talented photographers, painters, sculptors and their work can be found in the open air market or their private galleries in the historical streets. But, while out at the local thrifts the last couple of weeks I came across these two beauties........
Both by local Charleston artist and I only payed $18.95 for both prints!!!!!
The first is by local artist Anne Worsham Richardson. She does natural prints and this on is titled "Carolina Wren and Yellow Jasmine."( which is the SC state bird and flower...fitting...no?)  Even better...It's signed!!
The second piece is by Julia Homer Wilson. I have to do some more research on the print as I'm not sure what house is it and most of her things are only available through the Charleston Preservation Society.  All I know is it a beautiful piece! It came with the frame pictured and matched our Master Bedroom PERFECTLY!!

Thanks for stopping by today and checking out my goodies! Are you thrifting Momma? Found anything great lately?! Please share!!!

Wednesday, February 8, 2012

Simple Things

A child will teach you many things if you let them. How to love unconditionally. How to find joy in the smallest things. How to get goldfish crumbs in the tiniest car seat cracks.
During playtime today Holden taught me a lesson I seem to have forgotten in the last few years. He has tons of toys! Toys inside, toys outside, toys in the car and yet we always find him playing with something random. Like today. You'd never think that 2 sticks could make a child so happy.  He played in the back yard for a solid 45 minutes with just 2 sticks. Making me realize it really is the simple things in life that bring the most joy. In a world filled with social media, t.v. programs for everything from cooking to reality shows about Teen Mothers you tend to get wrapped up in the craziness that is life today.

So, while cooking dinner tonight I took out two of my favorite cookbooks (Farm House Cookbook / With Heart & Hand) and realized that it was the first time they had been out of the cabinet in over 6 months. I didn't need all these fancy websites to give me ideas for dinner. I had my cabinet of cookbooks from my Mother, my Mother in Law, Grandmother and Daddy. They bring me joy. It may just be a simple cookbook but to me it means more. The recipes are tried and true. Cookbooks from family vacation destinations, cookbooks showcasing true home-style recipes and cookbooks put together with love by countless little, old ladies of Hallsboro Baptist Church. And if your Southern you know NO ONE cooks better then a Baptist! So I vow to take a step back and look at the simpler things in life, slow down a little and make  Mama's Molasses Crumb Cake on page 332. It's screaming my name!!  How about you? What are your simple joys in life?

Wednesday, January 25, 2012

Master Bedroom Chair Unveiling....

Hello! The time has finally come to unveil my first REAL re-upholstery project!!
Upon deciding to find and re-vamp a chair instead of buying a new one I was SUPER excited to get started. Upon getting said chair in my garage ready to re-vamp I felt like I had gotten in a little over my head.
I came across this chair at a yard-sale while home visiting my Momma last Oct.. We had already hit up an estate sale and were heading back home and spotted a tee-tiny, little yard sale sign. I'm telling you people...Don't overlook those back out of the way yard sales ( as long as it's safe. ) They are were you will find some of your best treasures. I payed a WHOOPING $3 for this chair! Nothing wrong with it, it was a custom order from a NC furniture manufacturer ( that has sadly since gone under ) and was obviously the right price.
                                                                              Before


                                                                           After


Even Holden thought it was quite the bee's knees :o)


I bought the fabric at Hancock's on sale for $2.00 a yard. I fell in love with it when I saw it. I love toile and it went perfect with our master bedroom redo ideas! As for paint I used Krylon Glossy in Khaki over a coat of Krylon Gray Primer. It took 2 cans to get the finish I wanted especially on the wicker sides. You have to look at them from every angle to make sure they get covered. The cushions were still in great shape so we just ripped and recovered. I say WE because thankfully my wonderful Mother in Law offered to help me with this one :o)
All in all I'm very happy with the outcome but I'm still trying to decide. Do I need some upholstery tacks lining the back? Or maybe a decorative trim? What do you all think?

Total Price of Chair Overhaul
Chair : $3
Fabric : (2 yds at $2 each) $4
 Primer: $3
Paint: $8
Total: $18.00


Adorable, Chessey, Toddler Smiles...FREE.


~Alison


Tuesday, January 24, 2012

Just can't wait......

While doing a little 'work'  today I stumbled across this adorable fabric at fabricworm.com


Isn't it awesome!!! I mean.....Bugs and Boys just go together and I knew this was destined for a JonJon for Holden. I know..I know...It's a little early to be thinking summer clothes but with the balmy 70 degree days we've been having here you can't help but start to get into the warm weather mind set. Sewing clothing is still a new thing for me but after searching Prudent Baby I found a tutorial that doesn't look so scary. You can find the DIY JonJon instructions HERE.  As long as the first turn out.... well then I'm sure he will have quite a few in his summer wardrobe! Plus with awesome fabrics like this...
or this....
or this...

I'm sure I won't be able to pass up sewing some toddler cuteness for my little dude!


Don't forget to head over to Fabric Worm and check out there selection. I spotted a few things for me as well but I'll save those for another day :o)

~Alison

Wednesday, January 11, 2012

31 Days to an Organized Home

Organization is not one of my God given talents. I however strive every day to reach an organized point and always end up failing. So when I stumbled across Kelly's blog the other day she made it seem so easy!! Plus with a title like  The Complete Guide to Imperfect Homemaking it seemed right up my "perfectly cluttered, imperfect alley."
So I decided to commit myself to her 31 Days to an Organized Home.

Today is Day 2: An Organized Coat Closet { Day 1 was admitting you have a problem :o) }

And as you can see ours was in major need of cleaning out. Shoes, backpacks, purses, coats, scarves, gloves, toys and a few other things I'm still trying to figure out why they were in there!?
After 45 minutes of cleaning I had started to make some headway. I didn't want to buy anything to organize so I began scouring the house for things I could use.
For the hats, gloves, scarves, etc. I used a wall hanging spice rack I had stored in the craft room and 2 large Command Hooks. Worked perfectly! 
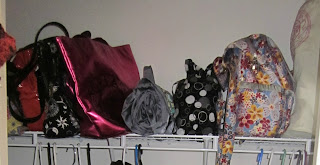
Jackets, coats and rain gear have there own sections in the closet by who they belong too. Purses are organized on the top shelf along with my yoga mat, our outdoor blanket and shopping cart cover. Visible and accessible!

I decided to also utilize all the space I could by hanging seasonal items like my beach bag from the shelf braces. Easy to find yet out of the way leaving room for other items. Shoes go along with the bottom with a small wicker basket for Holden's shoes. I kept it to a minimum storing only a few pairs here. Best part is keeping the shoes to only a few pairs opened up room for my vacuum! Which has been hanging out in the corner of my craft area for a few months now.
And here is my finished product. 

I am super proud! If you don't count the time it took keeping the toddler and the dog out of the closet it probably only took me around 30 minutes to get the finished product. Whoever thought you could feel so productive and reduce so much stress in such a small amount of time!
Kelly has some awesome tips on her site so go check her out and join me later for Day 3!!!


 .

Tuesday, January 10, 2012

Up and Running.......Kinda


So here it is.......My goal for the future. I'm refusing to call is my New Years Resolution because frankly I always fail at those darn things anyway.
I am taking the leap into the blogging world. To share my love for thrifting, DIY projects, sewing, cooking, life's adventures and all the messes that come along with it.
Biggest hiccup right now is figuring out the mapping of this thing. I see it in my head, I know what I want it to look like but actually getting it there is another story.
I hope you will follow me. I want to share the things I love in my life. Things that bring me joy. In hopes that it will do the same for you.

~Alison